15 December 2009
Grades for Students with Different Assignments
You may have a class where not all students do all assignments, and you want each student to have a points possible in the grades area that matches the assignments required for that student. For example, students who are returning to take the same class might have advanced assignments not required of their beginning classmates. To do this requires the use of groups, calculated grade items, and release conditions:
08 December 2009
From EZ Test to Desire2Learn
If your publisher (McGraw-Hill) offers the EZ Test program to create tests for your class, you can use it to create files to import into Desire2Learn. The linked document has instructions on how to use this software to create a random block of questions in a Desire2Learn quiz:
From EZ Test to Desire2Learn
From EZ Test to Desire2Learn
30 October 2009
Different Points for Quiz and Associated Grade Item?
Since the Properties tab of a quiz is where you set up its association with a grade item, but the points on the quiz are determined on the Layout/Questions tab, it is easy to see how there can be a discrepancy between the points possible on the quiz and the maximum points for the associated grade item.
One way to change this to change the maximum points for the grade item. Desire2Learn can then recalculate the points for the grade item based on the quiz score:
One way to change this to change the maximum points for the grade item. Desire2Learn can then recalculate the points for the grade item based on the quiz score:
- After you change the maximum points for the grade item, click on the Grade icon for the quiz
- Clear the graded check box for each attempt so it is marked as ungraded
- Click the Update button
- Click in the box to mark each attempt as graded
- Click the Update button


If you want to go the other direction (i.e., change the points possible on the quiz to match the maximum points for the associated grade item), the steps are a bit different:

21 October 2009
Quiz Time Restrictions and Auto-Submit Quiz Attempt
When auto-submit attempt is selected as an option for late submissions on a test that has an enforced time limit, students still must click the Submit button to submit the test for grading. No changes to the test page (changing answers to questions, saving unsaved answers) are allowed once the time limit has been exceeded. So even though you see that the student has exceeded the time limit, you know that none of the answers you can see were provided after the time allowed. If a student did not submit the quiz, you can do so on a student's behalf.
29 September 2009
Quiz Statistics and Ungraded Attempts
The quizzes page shows the number of attempts and graded attempts for each quiz, separated by a slash. If the numbers are not equal (i.e., if there are one or more ungraded attempts) clicking on the statistics icon may show an error. You can mark a quiz attempt as graded by clicking on the grade icon for that quiz. Then click on any ungraded attempts to view them, click the Auto-Grade button, click the check box to indicate the quiz is Graded, and then click the Save button. The quiz statistics should be visible.
Even if the statistics icon returns an error, you can likely view the statistics for each question on the quiz and the overall statistics in the grade area (if the quiz is associated with a grade item).
Thanks to Eddie Fagin for asking the question that led to this answer.
Even if the statistics icon returns an error, you can likely view the statistics for each question on the quiz and the overall statistics in the grade area (if the quiz is associated with a grade item).
Thanks to Eddie Fagin for asking the question that led to this answer.
28 September 2009
Pagers and Quizzes (In Progress)
If the quiz option is chosen to prevent use of the pager tool, that tool will be unavailable for students to use as long as that quiz attempt is in progress. This block perpetuates indefinitely, so it is possible for a student to be prevented from using the pager months after the semester ends in which the student did not complete the quiz attempt. When students in this situation try to use the pager, the system tells them the class that has the quiz attempt in progress. If the class was from a prior semester, it will require the instructor's help to remove the block.
Instructors can remove the block without making the entire class active by submitting the quiz on behalf of the student. This is explained in another blog entry.
Instructors can remove the block without making the entire class active by submitting the quiz on behalf of the student. This is explained in another blog entry.
Respondus LockDown Browser and the Macintosh
Apple's Snow Leopard operating system breaks the Respondus LockDown Browser in two ways:
This is for the Snow Leopard operating system only (not Leopard). I have reported this bug to Respondus and expect them to fix it soon.
- The keyboard shortcut for screen capture works while the browser is on (Apple/Command + Shift + 4)
- The screen-recording function built in to QuickTime X works while the browser on (it must be turned on before the browser is started)
This is for the Snow Leopard operating system only (not Leopard). I have reported this bug to Respondus and expect them to fix it soon.
24 September 2009
Saving Time with Release Conditions
If you reuse course components for a new semester, you may find it tedious to change the availability dates for the content modules, quizzes, dropbox folders, and discussion topics in the new course offering. One trick to save some time is to use release conditions to make certain items invisible until a student has taken some other action.
For example, you might not want them to post a comment in a discussion topic until they have visited the relevant content topic. If the discussion topic is conditionally released based on visiting that content topic, you can dispense with setting a date for that discussion topic to appear. Here are the steps for this example:
This cannot be used to set the end date of an item, so you will still need to change the availability dates for things that have due dates.
For example, you might not want them to post a comment in a discussion topic until they have visited the relevant content topic. If the discussion topic is conditionally released based on visiting that content topic, you can dispense with setting a date for that discussion topic to appear. Here are the steps for this example:
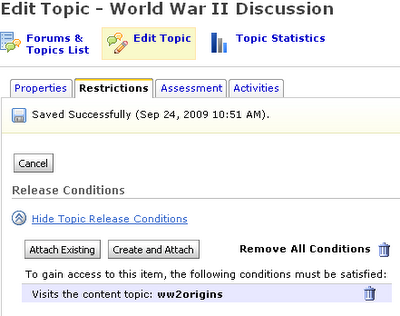
- On the item to be conditionally released, click on the Restrictions tab and then click the button to Create and Attach in the Release Conditions section of this page.
- Choose the type Content Topic visited and then choose the appropriate content topic
- Click the Create button and your release condition will appear (don't forget to click Save)

Remove Course Offerings
The process for removing course offerings is the same regardless of its creation process:
- Make the course inactive
On the Edit Course page, select Course Offering Information, uncheck the box indicating the course is active, and click Save.  Change your role within the course to Student
On the Classlist page, select your name, click the Change enrollment button, change your role to Student on the following page, and click Save.


23 September 2009
Filling in the Blanks on Answer Weights
For each answer in a fill-in-the-blank question, its weight is the percent of the question's point value the student earns for typing a correct answer. So if your question has four blanks and you want them to count equally toward the question's points, each should have a weight of 25.
17 September 2009
Respondus LockDown Browser and Mutiple Institutions
It is possible for a computer to be used the same term for online exams at different institutions outside of Los Rios. If those non-Los Rios institutions also use the Respondus LockDown Browser, the student will need to take some steps so they can use the browser with multiple institutions. These are from an email I received from Respondus:
If the student is running LockDown Browser for Windows, she can create a new LockDown Browser shortcut with your institution ID.
Here's the steps for running LDB for two different institutions on a Windows system. First, I'll assume she has installed other institution's version of LDB.
The student may also want to edit the properties of the LDB shortcut title for the original install so she doesn't confuse the two.
- Copy the LDB shortcut on the desktop and paste the copy back onto the desktop.
- On the second copy, "right click" on the icon and select "Properties"
- Under the "General" tab, add "LosRios" to the end of the "LockDown Browser" title.
- Under the "Shortcut" tab, add " /ID=xxxxxxxxx" (without quotes), where "xxxxxxxxx" is the 9 digit institution ID for your LockDown Browser. You can see the ID at the end of the URL that you distribute to students.
- Save the shortcut.
- Double click on the new shortcut to start LockDown Browser and verify it is accessing your institution.
If the student has a Macintosh, she will need to uninstall the other institution's copy of LDB and install your copy of LDB. But there is a little workaround if the student has Windows XP under Bootcamp (not a Windows VM like VMWare or Parallels) by installing and running the second LDB while in Windows under Bootcamp.
Weighted Grades and Item Points
If you use the weighted grade system, some students might be confused if they can see the points earned per item and the weighted grade per item. If an item has low points but a high weight and students did not score well on that item, they might wonder why their weighted percentage is lower than their percentage of points possible. You therefore might decide to show only the weighted grade for each item and not the points:

- On the Grades page, select Grades Settings and then Org Unit Display Options
- The Submission view options controls what your students see
- Turn off the display of points and then click the Save button

10 September 2009
Change Question Points after Grading
If you change the point value of a question (or answer) after students have taken a quiz and been graded, there are some things you can do ex post facto to re-score those questions:
- On the Grade page for the quiz, click on the Questions tab.
- Click on the question that needs to be re-graded and then click the grade icon
 - this refreshes the page and gives you the opportunity to give all students who gave a particular answer a specific point value.
- Click the Save button and your score changes will be applied.

03 September 2009
Export/Archive Courses and Grades
Instructors can export courses from Desire2Learn for archive purposes:

- From the Edit Course page, select Import/Export/Copy Components
- Choose the Export Components option and click Next
- Choose the components you want to export and click Next
- Click Next to confirm, then Desire2Learn generates a .zip file for you to download. Click on the link to download your file.


This file can be imported into any Desire2Learn course offering, so this is one way you can share course components with other instructors. Course offerings remain on the server for three years, so they will be immediately accessible to you during that time.

No student data is included in an export, so this is a poor way to archive class grades. To do this, get to the User List page by clicking Enter Grades on the left side of the page. This page has a button to Export Grades. Click this, and on the following page choose options and click Export to CSV. This creates a file to download that provides the quickest access to grade information for this course offering.


31 August 2009
Reset Quiz Attempt
 Instructors can reset quiz attempts, but the ability to do so has to be turned on:
- When looking at the Grade page for a quiz, click on the link to Display Options
- In the dialog box that opens, check in the box to Allow Reset and click the Save button
A check box will appear next to each attempt and a trash can icon will appear on the page to reset any selected attempts.
Hide Dropbox Attached Files
When a file is attached to a dropbox folder using the Add a File button, it is accessible to students outside the availability window set on the Restrictions tab. To hide the file from students until the availability window is open, link it instead inside the Custom Instructions field. The file should first be uploaded to the Manage Files area (access this via the Content page or the Edit Course page). Then insert a quicklink into the Custom Instructions field and choose the Course File category. When the availability window opens for that dropbox folder, students can click on the folder name to view its instructions, and the file will be linked there. [VIDEO DEMO]
Incomplete Grades
Our process of using a new course offering for each class for each semester gives us a few ways to handle incomplete grades:
- You can make the previous course offering visible to the student by changing its end date. To do this, select Edit Course and then Course Offering information. However, this will make the course offering visible to all students who were enrolled in the course. In addition, you will need to modify the quizzes or dropbox folders to add the incomplete students under the Add Users to Special Access section of the Restrictions tab for each assignment the student needs to complete.
- You can copy the necessary dropbox folders and quizzes into one of your course offerings for the current term and then manually enroll the student into the course offering. You may need to use the special access tool to limit access only to incomplete students if these assignments are not shared with the current students. Preventing these items from appearing in the grades area is probably a good idea, as they will confuse your current students. Click here to read the blog entry on the best way to enroll students manually.
- You can create a development course offering for handling incomplete grades and manually enroll students as necessary. You will also need to copy any necessary course material into the development course course offering. There is a minor cosmetic issue for students - this new course offering will appear on their My Home page under the "Training and Development" grouping instead of under a semester.
23 August 2009
Entry Limit for Chat Comments
Only 400 characters can be entered into a single chat comment. That is more than Twitter allows and is twice as many as this blog entry, including its title and label.
22 August 2009
Copying Grade Schemes
You can copy grade schemes among course offerings within the Schemes section of the Grades tool. On the Grades page, select the Grades Schemes option and click the Copy button on the Schemes List page. You will see a list of all the grades schemes you created in all of your course offerings (including the current one). Select the scheme you want to copy, type a name for your new scheme, and click the Copy button.
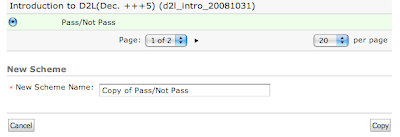
The following page is the edit page for the scheme you just copied.
18 August 2009
Turnitin and the Dropbox
The Turnitin.com plagiarism-detection service is now integrated with the dropbox. This is a single switch on the Properties tab for a dropbox folder immediately underneath the folder name:


Note: If you allow students to do multiple submissions to the dropbox folder, Turnitin will treat subsequent submissions to the same dropbox folder as "revisions," meaning that those subsequent submissions will not consider the text from the original submission as a similar source.
Turning this switch on means documents submitted to this folder will be checked for plagiarism as if the student or instructor had submitted it directly to Turnitin.com. The instructor can decide whether to show the Originality Report to students and whether to make the process automatic for all submissions or selectively. The bottom of the Properties tab includes a section "Plagiarism Detection Options" if this switch is on. Turnitin currently accepts the following file types for submission: MS Word (.doc), WordPerfect (.wpd), PostScript (.eps), Portable Document Format (.pdf), HTML (.htm), Rich Text (.rtf) and Plain Text (.txt). All files submitted to Turnitin must be text based. Papers which have been scanned must be sent through Optical Character Recognition (OCR) software before they can be submitted to Turnitin.
Once enabled and a report finishes processing, the folder list will show a color-coded label showing the percentage of plagiarized text in that document.
Note: If you allow students to do multiple submissions to the dropbox folder, Turnitin will treat subsequent submissions to the same dropbox folder as "revisions," meaning that those subsequent submissions will not consider the text from the original submission as a similar source.
17 August 2009
Adding a Course Event to Calendar
There are two ways to make a course event in the calendar. One is to click the box "Display in Calendar" when an item has a date restriction set. This makes an event that will appear automatically in the calendar of all students enrolled in that class, and the event will be a link to that particular item.
A second way is to create a new event and make it a course event. At the bottom of the New Event page is an option to choose the Event Access. Choosing the course name makes the event appear automatically in the calendars of all students enrolled in that class. The description can include anything, including quicklinks to course material.
In both cases, the calendar widget on the course home will show a date in bold type if there is a course event on that day.
14 August 2009
Ongoing Discussion Grades
Instructors can use a combination of grade categories and hidden items to create an ongoing discussion grade, which saves having to re-read every post at the end of the semester when assigning an overall discussion grade:
- On the Grades page, create a new category with the name for your overall discussion grade (eg, "Online Participation").
- For each topic that you want to count toward your overall discussion grade, edit it and click the Assessment tab.
- Click the New Grade Item link and (in addition to the name and points possible), choose the category you picked and the option to "Hide this grade item" on the New Grade Item dialog box.
 There are two advantages to hiding the grade item: it makes the students' view of the grades page shorter, and it allows the instructor to make some topics optional without adding to the anxiety of students seeing they got zero points for a grade item.
The points possible for the category will be the sum of the points possible for the discussion topics it includes. As the instructor grades each discussion topic, the overall discussion score grows over the course of the class.
Thanks to Timaree Hagenburger for asking the question.
05 August 2009
Quicklinks and Date Availability
One effective use of QuickLinks is to provide direct access to an assessment tool (like a Dropbox folder or a Quiz) from your Content area. If the target of the QuickLink has a start date in the future, students clicking on it see an informative note. So when resetting the date ranges for a subsequent offering of the same course, you can dispense with setting a date availability range for your QuickLinks. If you wish, click on the Restrictions tab (as you do with other items).
04 August 2009
Restore My Edit Course Link
Click this to go to the edit navbar page, and you can restore the Edit Course link to any of the navbar locations. (The default location for Edit Course is the bottom right.)
The Edit Course link is not visible to student users enrolled in your course.
23 April 2009
Respondus LockDown Browser
Respondus LockDown Browser is a tool that instructors can use to add additional security to quizzes. When students use Respondus LockDown Browser they are unable to print, copy, go to another URL, or access other applications. When an quiz is started, students are locked into it until they submit it for grading. This works for both Windows and Macintosh computers.
This same tool can be used to prevent students from printing, copying, or accessing other applications when viewing quiz feedback if you have that option chosen on the Restrictions tab for that quiz.


02 April 2009
Optional Assignments and the Final Grade
You may want to make some assignments optional, but do not want the points possible for those assignments to count against students on the final grade. You can set the maximum points possible for an individual item, but this is not allowed for categories.
For example, you might require students contribute to five of the ten discussion topics in your class but let your students decide which five topics. Each topic is worth 5 points, but you want the points possible for discussion to be 25, not 50. The other items in the course (quizzes, exams, and papers) add up to 375 points, so you want the points possible for the course to be 400.
The solution to this problem involves two grade formulas - one for the optional assignments and one for the final grade. Start with a new grade item (on the Manage Grades page, choose New Item and then click Formula). Set the Max. Points equal to the points that these optional assignments can count toward the course grade. Then click the link Edit Using the Formula Editor and make your formula a simple sum of all the points possible for the group of optional assignments. Make sure you do not choose the Can Exceed option.
Continuing the example above, the new formula item sums the points possible for all ten discussion topics but has a maximum points possible of 25. If a student were to earn full points for participating in more than five topics, the points for that student for discussion would be no more than 25.
Then make your final grade a formula (not points or weight). Chose the Calculation Options tab on the Grades Settings page and select Formula for the Grading System. Then go to the Manage Grades page and click on the name of the final grade item (the default is "Final Calculated Grade") to edit it. Click the link to Edit Using the Formula Editor and create a simple sum of all the items in your grades area, including the formula item you created above but not including any of the items included in your formula item. The Max. Points for the final grade should be the total points possible for your class.
The final grade formula for the discussion example sums all of the other items in the class (quizzes, exams, papers) and the discussion formula item but not any of the discussion topics. The Max. Points for the final grade would be 400.
The formula final grade is still hidden from students until it is released, just like the points and weight final grades. Note that the option to drop ungraded items from the final grade calculation will not work with a formula final grade, though you could change the Max. Points for the formula final grade periodically as you update students' grades.
18 March 2009
The "Smith" Factor
If you want the ability to adjust a final grade to extend some compassion to your students, there are a couple of ways to do this:
- Change the grade of one of the items
- Create a hidden bonus grade item
If you choose the second option, make sure you turn on the "Can Exceed" switch for that item unless you want to limit the number of bonus points you can award. If you want students who receive the bonus to know where those mysterious extra points came from, make sure that you have the following options chosen:
- Turn on the "Drop ungraded items" switch (Grades Settings >> Calculation Options)
- Turn on the "Display final grade calculation to users" switch (Grades Settings >> Org Unit Display Options)
By making these choices, students who get the bonus will see it if they click the calculator icon next to their final grades.
Special note for weighted grades: If you choose weighted grades, you must assign the item a weight greater than zero. Since the item is a bonus, its weight will not count toward the overall class weight.
24 February 2009
External Links on the Course Homepage
The bookmarks in D2L are generated by students as they opt to bookmark content topics. They are created individually, so each student can decide what to add to their Bookmark widget. Bookmarks cannot be links to outside web pages (though the content topic that they link to can be a quicklink).
There are three ways to add a link yourself to the course homepage:
- Create a News item and include a quicklink in the item's content. If you do not set any calendar restrictions on the item and keep it at the top of your news widget, it will always be visible.
- Create a custom widget and add to your course homepage.
- Create a custom navbar link. This has the advantage of always being visible, no matter where students are in your course.
11 February 2009
Extra Unread Files in the Dropbox
 If a student is dropped from your class and submitted any files that had not been marked "read" to a dropbox folder before the drop, those files will still appear as unread to you and show up on your course home page in the Updates widget as well as the list of unread files for that folder on the dropbox page. When you click on the dropbox name, the default list is by student. Dropped students will not appear on that list, so you will not be able to change the read status of those files on this page. To do that, click on the Files tab to see all of the files uploaded to this folder, including those from dropped students. On this page you can change the read status of a file by clicking on the envelope icon.
26 January 2009
Synchronous Communication
There are three options for synchronous communication with your students:
- One is to use the pager, which is a tool that appears in the navbar and works well for sending short messages. These messages are not visible to anyone except the sender and receiver(s).
- A second option is the chat tool, which is a tool you can link from the navbar. Everything typed into a chat window is logged and chat transcripts are available to everyone. Chat is text only.
- If you want rich-media synchronous communication, the best option is CCC Confer. This is a web-conferencing tool that includes a phone bridge and tools that allow you to share applications. Confer sessions can be archived. For more information, visit the CCC Confer web site: http://cccconfer.org
Grades Settings for Large Courses
Desire2Learn makes the following suggestions to speed the loading of the grades area if your course has a large number of students:
- Set the number of users to display per page to a low value
- Sort the User List by user instead of grades
- View the User List by section
- Do not show decimal places
- Do not repeat user details or grade item details
- Do not repeat the final grade at the start of the user list
- Do not select the Automatic keep final grade updated option
- Only display one user detail (e.g., Last Name)
- Only display one grade detail (e.g., Points grade)
- Only display grade items and categories that you want to edit while in Spreadsheet View
- Do not create unnecessary items or categories
- Do not create unnecessary calculated or formula grade items
- Avoid making changes to grade schemes or the grade system once grades are assigned
- Only import grade items when data has changed
24 January 2009
Student Quiz Re-entry
When a student is taking a quiz, that student's attempt is "in progress" until one of three things happens:
- The student submits the quiz
- The availability window for the quiz ends
- An enforced time limit for the quiz expires (and the instructor has selected the option to auto-submit the attempt)
If a student leaves an attempt in progress, including closing the browser or suffering an network connection interruption, the student can re-enter the quiz and complete it at any time until the availability window for the quiz ends.
15 January 2009
Use Images in Multiple Locations, Including Quizzes
You may want to use the images in multiple locations in your course, say in the content area as well as part of a quiz question. If you upload the image at the time you create the question, that file will not be available inside D2L for re-use. However, if you upload the image to your Manage Files area first, that image will be available as a course file anywhere inside your course offering, including in a quiz: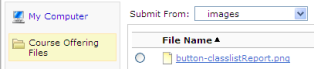
- You may find it helps your organization to create a folder inside your Manage Files area for images (click the
 button to create a new folder).
 - Enter the folder you created by clicking on its name and then upload an image to the folder by clicking the
 button.
 You can upload multiple images simultaneously by packaging them together into a single .zip file. Once you upload the file, a button to unzip it will appear.
 - To display images anywhere in your course, use the Course Offering Files on the Submit a File dialog box and navigate to the location in your Manage Files area where you uploaded your images.
05 January 2009
Certain Characters in Filenames Cause Dropbox Problems
The following characters if used in a filename of a file that is submitted to the dropbox will cause the dropbox to be inaccessible by faculty:
\ / : * ? " < > |
Students will continue to be able to submit assignments even if the dropbox is inaccessible.
Subscribe to:
Posts (Atom)