08 December 2008

Limit a Syllabus to Certain Students

Revised 11/2013

If you group students from multiple classes into the same course offering, you may want to show some content (like the syllabus) to students enrolled in a certain class. Use the release conditions to do this. Here are the steps:
  • When creating a new topic or editing an existing topic, click the Restrictions tab (this is the same tab that has the date restrictions)
  • In the Release Conditions section, click the button Create and Attach


  • Select Section Enrollment as the condition type in the pull-down menu that appears

  • In the Condition Details portion of the window, choose the section from the pull-down list - you will need to match the five-digit enrollment code that is part of the section name
  • Click Create and you will see your release condition at the bottom of this page.

  • Click Save and this content will only be visible to students who meet the criteria you selected.
After you create a release condition, it will be available for your use on any other item in your course offering. You can click the Attach Existing button to limit other content items, quizzes, dropbox folders, etc. You can copy release conditions from class to class, but this example will not work in any other class because the section code will differ.

04 December 2008

View Solution to Homework Submitted via Dropbox

If you have students turn in homework assignments via the dropbox and want them to see the solution after they submit, there are a couple of ways to do this:
Give the students the homework solution file as part of the feedback for the assignment. On the Leave Feedback page there is a button Add a File that you can click to add a file from your local computer that will only be visible to that student. You could wait to provide feedback to students until after the assignment is due if you are concerned about the early submitters sharing the solution file with their classmates.
Another option is to include the file as part of the grade item for that dropbox folder instead of as part of the dropbox folder feedback. This allows you to control exactly when the file appears; you may want to let students know in the Custom Instructions field for the dropbox folder where and when the solutions file will appear.. First, upload the file to your Manage Files area:
  • Click Edit Course on the navbar.
  • Click Manage Files and then click Upload
  • In the window that opens, click Browse to find your homework solutions file and then click Upload
Now your file is ready to be quicklinked from the grades area:
  • On the Grades page, click the Manage Grades button
  • Click on the Enter Grades icon for the item associated with the dropbox folder
  • Click Show details and overall comments
  • In the Overall Comments box, insert a quicklink to the course file you uploaded above - don't forget to click Save
If you do not want students to see the solutions file until after the assignment is due, you can make the grade item appear at that time:
  • While on the Manage Grades page, click on the name of the grade item associated with the dropbox folder to edit it
  • Select the Restrictions tab and choose a Start Date for the item's visibility - don't forget to click Save
A third option is to create a content topic that includes the homework solution and set the availability date for that item to take place after the assignment due date. As with the option to attach it to a grade item, you may want to let students know in the Custom Instructions field for the dropbox folder where and when the solutions file will appear.
Finally, you can use release conditions to display the homework solution automatically as soon as students receive feedback from you. One of the condition types is "Receive Feedback on Dropbox Folder." You can create a release condition using this type (D2L will prompt you to select a dropbox folder) and limit the content topic to students who meet this criterion.

01 December 2008

Students can Break a Dropbox Folder

If a student renames a file in the middle of submitting it to a dropbox folder, that folder is locked for the instructor only. All students, including the one who caused the problem, can still submit files, and the folder's availability will change as originally scheduled. If this happens, contact the help desk because Desire2Learn must be involved in the fix. No data is lost.

17 November 2008

Drop the Lowest Quiz Score

Revised 11/2013

You can use categories in the grades area to drop the lowest score of all the items within that category. Desire2Learn will automatically adjust the total points possible for the course appropriately. Here are the steps:
  1. Create a category for grade items by clicking on the Manage Grades button on the Grades page and then clicking New Category.
  2. On the New Category page, you must turn on the option to Distribute points across all items so that you can decide to drop any number of "lowest non-bonus items" from each user's score for that category.
  3. Now when you create new items in the grades area, you can select this category. To move extant items into this category, select the items on the Manage Grades page and then click the multi-edit icon ().
  4. This opens the Edit Items and Categories page. On the right side of this page is a column indicating the category of each item you selected in the previous step. Select the appropriate category and then click the Save button.
Note that not all grade items must be in a category.


14 November 2008

Preparing Quizzes

This posting describes the minimum steps to get a quiz ready for use. Some steps can be done in a development course offering before they are copied into a course offering that will have students in it:
Links to Quizzes in the Content area
For each quiz, there will be a broken quicklink in the Content area. Depending on how you set up your quizzes in Blackboard, you may have one module with all of these links or they may be distributed among the modules. You can which content topics are quicklinks by the icon (). You have two options for each of these quicklinks:
  1. Remove them (this will not remove the quiz) Students can see the Quizzes area so they can still take these quizzes.
    • Click in the check box next to each of the quiz quicklinks you wish to remove
    • Click the delete icon () to remove the selected quicklinks 
  2. Edit them so they point to the appropriate quiz Choose this option if you want to maintain the quiz links within the flow of your content design.
    • For each quicklink, click the edit icon ().
    • On the Properties tab, the URL field will be empty - click the quicklink icon ().
    • Select Quizzes from the Category menu and then the appropriate quiz for this quicklink.
    • Click the Insert button and then the Save button.
Connection to Grades
The connection between each quiz  and the grades area is not maintained, so a grade item will need to be created for each quiz that you want to count toward the course's final grade:
  1. On the Quizzes page, click the name of a quiz to edit it.
  2. In the General section of the Properties tab, click the link to add grade item.
  3. In the New Grade Item window, type a name for the item and a point value and click the Save button. The point value does not have to be the same as the total points of the questions on the quiz; Desire2Learn will automatically adjust scores based on the ration between the value of the questions on the quiz and the value of the grade item.
  4. Turn on the options to allow automatic export to grades and attempt to be graded immediately upon completion if you want the grade data to appear in the grades area immediately (similar to Blackboard).
  5. Click the Save Quiz button.
Submission Views
The default view of the quiz when a student submits it is to see only the points earned and the total points possible for the quiz - not how each question was answered. You can change these settings by changing the default submission view for each quiz:
  1. On the Quizzes page, click the name of a quiz to edit it.
  2. Click the Submission Views tab.
  3. Click the Default View to edit it.
  4. Choose which options you want for this view and then click the Save View button.
Questions
To change or remove questions:
  1. On the Quizzes page, click the name of a quiz to edit it.
  2. Click the Layout/Questions tab.
  3. Click the Add/Edit Questions button.
  4. Select a question by clicking in its check box and then the delete icon () to remove it from the quiz. As you confirm your deletions, the questions are removed and this action does not need to be saved in a separate step.
  5. Click on a question name to edit it (change question text, answers, etc.). As you click the Save button to confirm your edits to each question, the changes are made and this action does not need to be saved in a separate step.
Other tasks are best done in the course offering that will have students in it (do these after copying the course components from the development course offering):
Availability Dates
You may want to make each quiz available to students only during a certain period of time:
  1. On the Quizzes page, click the name of a quiz to edit it.
  2. Click the Restrictions tab.
  3. In the Availability section, choose to make the status of the quiz Active and a date range if you wish. Note that quizzes copied from Blackboard are active by default.
  4. Click the Save Quiz button.

13 November 2008

Questions in Quizzes and the Question Library

Any question that appears in a quiz (including those in random sections) exist within that quiz, so anything that is in the Question Library is extra. The Question Library is useful if you want to reuse questions in multiple places (say in a chapter quiz and again on the midterm or final), but once questions appear in a quiz their existence in the Question Library is unnecessary. This is not the same as in Blackboard, where pools have to exist if the instructor is using random blocks. In Desire2Learn, every time a random section is created in a quiz, the possible questions are copied into that quiz.

31 October 2008

Importing Grades

You can import grade data into your course offering and create new grade items with the import process. This is most efficient if you start by exporting your extant grade list:
  1. In the Grades Area widget, click on the Enter Grades button and then Export Grades.
  2. On the Export Options page, you can choose any or none of your extant grade items to export - click the Export to CSV button and a new browser window will open with a link to download the file.
  3. Open the downloaded file in a spreadsheet program and enter any grade data you wish for the extant items you included in the download.
  4. If you want to create new items, insert new columns into the spreadsheet you downloaded.
    • The heading for each new column must include the words "Points Grade" in addition to the name of the item.
    • The final column on the right must have the heading "End-of-Line Indicator" and each cell in that column must have a pound sign (#).
  5. Save your file as a CSV file (comma-separated values), not a plain-text or tab-demilited file - this will not be the same format as the downloaded file, which is plain text despite its .csv extension.
The import grade data process takes five steps. Begin by going to the Enter Grades page and click on the Import Grades button.
  • Step 1: Browse to find the CSV file you created in step 5 above and select it. If you created any new grade items following the guidelines in step 4 above, you must click the box to create new grade item before clicking the Next button.
  • Step 2: Confirm that you want to create any new grade items present in the import file and click next. This step is skipped if you did not create any new grade items in the download file.
  • Step 3: Decide on the properties of each of the new grade items. This step is skipped if you did not create any new grade items in the download file.
  • Step 4: Lets you know if there are errors or warnings. This is step 2 if you did not create any new grade items in the download file.
  • Step 5: Previews the import, showing the grades for each student. Click the Import button on this page to add the grade data to your class. This is step 3 if you did not create any new grade items in the download file.
Note that the files involved are all plain text, so only values can be imported (not formulas from your spreadsheet program). You can use the formula editor inside Desire2Learn to create sophisticated grade formulas.

20 October 2008

Giving Individual Students Extra Quiz Access

Revised 11/2013

You can give individual students extra quiz access through special access, which is an option on the Restrictions tab when you are editing a quiz. (It's near the bottom of the tab under "Advanced Availability.")


The Special Access window allows you several options:
  • Change the start and/or end date for the quiz Use this to give a student early or late access
  • Give a different time limit, grace period, or late submissions Use this for DSPS students or to give a student extra time without allowing additional attempts
At the bottom of the Special Access window, select the student(s) you want to have this access. You can set up more than one special access rule if you have different needs for different students.


17 September 2008

PowerPoint Options

NOTE: The instructions in this blog entry may differ if applied for use with Los Rios Google Apps.
A PowerPoint presentation can be uploaded into the Manage Files area and linked to like any other file type. However, this assumes that students have PowerPoint installed on whatever computer they are using to view the presentation. To help students overcome the need to purchase additional software, instructors have six options:
  1. Limit students to on-campus access to your presentations
    Since all of the computers on campus have Microsoft Office installed, you can tell students who do not have this software on their home computers that they must come to a computer lab on campus to view those files.
  2. Share information about free alternatives to Microsoft Office
    There are several free alternatives to Microsoft Office available, and these programs can open and create PowerPoint-compatible files. They also can open and create files in Word and Excel format, so installing this free software will give students a lot of flexibility. For a Windows computer, OpenOffice.org works as an alternative. On the Macintosh, NeoOffice is available. Both of these options assume students have the time, ability, and administrative privileges necessary to install software on their local computers.
  3. Give students access to the free PowerPoint viewer
    If you are only concerned about whether students can see PowerPoint presentations, another way to do this is the free PowerPoint viewer, available from Microsoft. You can direct students to search the Microsoft.com web site and have them search for “PowerPoint viewer” or “PowerPoint viewer Macintosh.” This also assumes that students have the time, ability, and administrative privileges necessary to install software on their local computers.
  4. Convert the PowerPoint presentation to PDF format
    Adobe Acrobat Reader is a free program that is nearly ubiquitous, so sharing documents (including PowerPoint presentation) in PDF format is an effective way to provide material to students without worrying whether they have the correct software installed. Free software to create PDF files on a Windows computer is available from CutePDF.com, but you will need the full version of Adobe Acrobat if you want to add features like forcing the file to open in full-screen mode. You can get the full version of Adobe Acrobat for your on-campus computer, and it is available on the computers in L125. All Macintosh computers can create PDF files from any document. Google Docs (see next option) and the free alternatives to MS Office all have the ability to create PDF files.

    Once a presentation has been converted to PDF format, you can upload it to your Manage Files area and then add a quicklink to it from the content area. You should also include a link to the free Adobe Acrobat Reader software for those few students whose computers do not already have this software installed.
  5. Make a Google Docs Presentation
    Making a web page out of your PowerPoint file provides the easiest access to students. Google Docs is a free alternative to Microsoft Office that you can use to create and share online documents that are compatible with Word, Excel, and PowerPoint. You can upload a PowerPoint file directly into your Google Docs account and then share that file via a quicklink in your content area. Google Docs is free, and you can use your Los Rios email address as your username. Documents that you create (including uploaded PowerPoint files) can be shared with anyone. Students do not have to have an account with Google to view these documents. A shared Google Docs Presentation becomes a web page that anyone can view. To get started, go to docs.google.com. You can also watch a video demonstration.
  6. Save the PowerPoint presentation as a web page
    Making a web page out of your PowerPoint file provides the easiest access to students. They do not have to have any additional software on their computers, and they will have one-click access to the presentation itself. You can also save your PowerPoint file as a web page and then upload that to your course offering.

    Here are the steps:
    1. Save your PowerPoint presentation as a web page, but not the option for a “single file web page” (this option is only viewable by someone using Internet Explorer)
    2. This process creates two items on your computer: a web page and an associated folder (the name of the folder is the same as the web page with “_files” appended)
    3. Select both of these items and create an archive file (right-click and choose Send to Compressed (zipped) Folder
    4. Upload the archive (it will have a .zip extension) to the Manage Files area of your Desire2Learn course offering
    5. Click the Unzip file button and Desire2Learn will extract all of the files into your Manage Files area
    6. Now you can link to that presentation by selecting the web page file you created in step 2 above
    This must be done on a Windows computer, but the results can be viewed on any computer. Viewers who are not using Internet Explorer for Windows will get a message warning them that this web page has been optimized for Internet Explorer, but they will be able to click through that warning and view the presentation.

Safari and the Compose Button

The pop-up blocker in Safari prevents users from writing new messages in the discussion area. Clicking the Compose button is blocked, but clicking the Reply link works. The solution for the user is to turn off the pop-up blocker. Open the Safari preferences, select the Security tab, and click to turn off the pop-up blocker.
This issue affects the Safari browser on Macintosh and Windows computers. Since Safari is the default browser for the Macintosh computer, it is more likely to be an issue for people using that operating system.  Macintosh users who are using Firefox are not affected by this issue.

15 September 2008

Disappearing Discussion Drafts

When composing a discussion entry, a user might be confused when clicking the Save Draft. The Save Draft button makes the message disappear. There are two ways to bring it back immediately:
  1. Click the Refresh button at the top of the discussion frame (not the browser refresh button)
  2. Select Drafts from the View menu and then click the Apply button to show the drafts for that particular topic.

09 September 2008

Renaming Automatic Calendar Events

Thanks to Markus Geissler for sharing this discovery: When you click the check box to "Display in Calendar" when you add a date availability restriction to an item, the name of the event in the calendar is not dynamically updated if you change the name of the original item. To change the event name, you have to uncheck that box, save changes, and then re-check that box.

Inserting a Quicklink to a Calendar Event

Thanks to Mark Springer for sharing this discovery: If you want to add a quicklink to an event in your calendar, select the date of the event and then click the "Refresh Event List" button to see the events for that day in the calendar. You can attach a quicklink to an event that you created manually or to one that was created when you clicked the check box to "Display in Calendar" when you add a date availability restriction to an item.

02 September 2008

Show Only Points in Grades Area

Revised 11/2013

The D2L grades area shows percentages for each item by default. To switch your view to points only, take the following steps:
  • In the grades area, click on Grades Settings
  • Turn off the option to show the "Grade scheme symbol"
  • Turn on the option to show "Points grade"
  • Click the Save button
These options are for your personal view of grades. To change what your students see, click on the button for Org Unit Display Options. You can make similar settings there.

24 August 2008

Seeing the Student Perspective

There are a couple of ways for an instructor to explore a course offering from a student perspective. The first is through the Role Switch widget, which is available on the default course homepage. Pick the student role and click the Change Role button and you will see your course offering from a student perspective. To switch back to your instructor role, you can use the same widget on the course homepage or click on the link to My Home. You can use this role to see what it looks like to submit a file to any of your dropbox folders. Here are the steps, with the appropriate role in square brackets:
  1. [Student] Go to the dropbox area and submit files to a folder
  2. [Instructor] Go to the dropbox area and provide feedback to the submission you did while in student role
  3. [Student] Go to the dropbox area to see the feedback you submitted while in instructor role
If you associated the dropbox folder with a grade item, you can see the grade and feedback also in the grades area while in the student role. Role switching does not allow you to take a quiz while in student role. You can do this (and see feedback) while in instructor role by using quiz preview:
  1. Click the Preview icon in either the quiz list view or edit quiz view
  2. Click the Start Quiz! link (note that in preview mode, all of the restrictions to quiz access are turned off)
  3. Take the quiz, answer any questions you wish, and click the Go To Submit Quiz button at the bottom of the page
  4. On the submit page, remember to click the box to allow the preview to be graded if you want to see students' feedback view
  5. After you see the submission receipt, click on the Quizzes link and then the grade icon for the quiz you previewed
  6. On the grade quiz page, limit your search to users with preview attempts and click the Search button (you do not have to type anything in the Search For: box)
  7. Click on the preview attempt, make any changes you wish to the automatically scored questions (including adding feedback), and click the Save button
  8. Click the Preview link again and then the Submissions button to see your preview attempt and the feedback you provided (you will see the most recent submission view you have set up for your students)

23 August 2008

Email formatting bug shows HTML codes

An email sent from inside Desire2Learn includes the HTML formatting codes, which makes it difficult to read. Our technical staff is working on this bug. For a workaround you can use the email system built on the Contact Students tab in the OGS system (inside.losrios.edu). That text box does not have this bug and the email addreses and roster are exactly the same as in D2L.

12 August 2008

Calendar Visibility for Course Items

For a course item to be visible in the calendar, the course offering must be active. Events in an inactive course are not visible to enrolled students and enrolled instructors. Instructors can see an item's calendar visibility by editing the item.

File Types and the Dropbox

Dropbox folders will not accept as uploads files that have an .exe or .vb extension. These are program files and are treated as a security risk. In order to submit these files to the dropbox, students should first archive them into a zip file. The instructor can then download them and unzip them on a local computer.

04 August 2008

Organizing Content (Modules and Folders)

Each time you create a Topic in your Content area, that item exists simultaneously in two areas:
  1. The Content area, where you control student access to the material
  2. The Manage Files area, where you can upload files directly from your local computer
The organizational structure for each of these areas is distinct. In the Content area, "Modules" are used to control the flow of information as it is presented to students. In the Manage Files area, you can use "Folders" to make the list of files easier to view. There is no automatic relationship between Modules and Folders, so a Folder will not be created for each Module. When you remove a Topic or Module from the Content area, you are asked whether you want to remove the corresponding files from the Manage Files area at the same time: If you choose the default (top) option, the files will remain in your Manage Files area but will no longer appear in the Content area. You can make them reappear by selecting the Course File option when you create a new Topic (anything in your Manage Files area is a Course File eligible for selection). The Manage Files area is a convenient place to upload files from your local computer, like PowerPoint presentations and Word documents. Those files are then available to be linked as Course Files, either as a Topic or as a QuickLink within a New File Topic.

11 July 2008

Import content from publisher

Desire2Learn does not yet work with the cartridge download keys that publishers provide for Blackboard, but you can get content from your publisher for use with Desire2Learn. Here are the steps:
  1. Tell the publisher you need a Blackboard or WebCT formatted course export file. Files can also be in SCORM format. The preferred format is Desire2Learn, of course, but not all publishers are yet able to provide that.
  2. Likely the publisher will give you a direct link to the file, or you might receive instructions to download the file from an FTP site. Download the file to your local computer. The file will have a ".zip" extension.
  3. In a Desire2Learn course offering, select the Edit Course option on the navbar and then Import/Export/Copy Course Components
  4. Choose the option to Import Components from a File and browse to the file you downloaded.
  5. The file will upload to D2L and you will get an opportunity to select the entire package or just certain sections, just like copying components from another course offering.

10 July 2008

Course Creation and Enrollment

You will request a new course offering for each class for each semester that you want to use D2L. That means that no students will be linked to your current course offerings. When the request process is ready (about two months before the term begins), you will be able to request course offerings for your classes. Those will be created  overnight, and then you can copy the components over.

The request process takes place via the Employee Self-Service web page. Online help is available on that page: http://www.losrios.edu/ess [VIDEO DEMO]

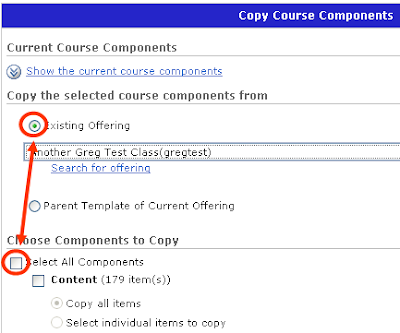
The copy process is very easy. Select the Edit Course link on the navbar and then Import/Export/Copy Components. Stick with the default option (Copy Components from another Org Unit) and then click the Next button. You can choose any other course offering you are teaching from the "Existing Offering" pull-down menu. The page will refresh, showing you how many items are associated with each component. There is a check box to "Select All Components" and a Next button. (You can copy only certain components if you wish.)


The copy process takes a short amount of time (a few seconds to a minute or two). Once finished, you can edit the components in the new course offering. Any changes you make in the new course offering will not affect the components in the old (source) course offering.

By default, all new course offerings are not active, which means student users cannot see it. On your My Home page, any inactive courses are indicated by italic text (Inactive). To change a course offering's active status, choose the Edit Course link on the navbar for that course and then Course Offering Information. On that page is a check box to change the course offering's active status. [VIDEO DEMO]

Enrollment happens automatically, beginning seven days before the start date for that class. Students who add your class will appear on your classlist the day following their official enrollment in your class. Student users will also be dropped the day following their official removal from the class. Grade information for dropped students is not removed and will reappear if they are added again to the classlist.

09 July 2008

Discussion locks and availability

Discussion Locking Options and Availability options can be set under the properties tab of the discussion. These are ways to control student access to discussion forums and topics:

Visibility
  • Forum is always visible - when a forum or topic is always visible, students can see it. They can read the messages inside and post new messages or reply to extant messages.
  • Hide this forum – when a forum or topic is hidden, students cannot see it. It only becomes available when you manually make it visible.
  • Forum is visible for a specific date range – when a forum is visible for a specific date range, students will only be able to view the discussion during that specific time frame. You have the option to customize a start date and an end date.
Locking Options
  • Unlock forum – when a forum or topic is visible and the students can post new messages or reply to existing messages.
  • Lock forum - when a forum or topic is visible but the students cannot post new messages or reply to existing messages.
  • Unlock forum for a specific date range – when a forum or topic is visible and the students can post new messages or reply to the discussion only during the specified time frame. After the time frame is over the forum locks itself and no students can post or reply to messages.
The availability or locked status of a forum cascades down through all of that forum's topics, so if a forum is not currently available that means none of the topics inside can be seen. The same applies to its lock status. For both forums and topics, these options are displayed on the Properties tab when the forum or topic is being created or edited. The options for locking and availability may have to be displayed:

08 July 2008

Get an email when a student submits a quiz

You can set up your quizzes to get an email when your students submit a quiz.
  1. On the Properties tab for a quiz, expand the Optional Advanced Properties section of the page.
  2. Enter a notification email. You can use any email address, but it must be a complete email address:

The email that the system sends tells you which course, quiz, and student.

26 June 2008

Decide when students see test results

You can schedule when grade information on tests appears to students. The default view for students to view test grades does not allow a date to access as it presumes immediate availability. To set a date for students to view more details, go to the quiz, then Submission Views, then add an Additional View. You will see parameters for View Restrictions that enables one to set a date in the future (or now).

06 June 2008

Email issues

Sending email works best when it is used from the classlist, as the email tool has options that might be confusing. From the email tool, the address book has people from across the district who have no connection to the user (i.e., they are not classmates or instructors for that student). From the classlist, a user can select an individual or group of individuals to send an email to.

Dropbox file save options

The dropbox is the tool you can use to collect file submissions from students. Students do not have the option to save a file in the dropbox, but they can save a file in their locker and submit the file directly to the dropbox from their locker. There is an option on the dropbox submission area for students to choose a file from their locker, group locker or from their local computer.

05 June 2008

Locker storage limit

The district IT staff is currently discussing how high they can increase the storage limit for the locker (currently 1MB). I will update this post as I find out more.

Email addresses

Each user account has an email address associated when created, which for students is the iMail address and for instructors is the Los Rios email address. Instructor users can change their email addresses. Student users cannot change their email addresses. They can set up their iMail forwarding preferences to have messages sent to that address forwarded to any other email address. There is a second place to indicate an email address that all users can access. This is the Reply To address. To change this, select the Preferences link in the My Settings widget on the My Home page and then click on the Email tab. The Reply To address does not replace the email address associated with a user's account. If a user types something in this field, that address becomes the "From" address for all messages sent by that user from inside Desire2Learn. An instructor can always email from the Classlist to the students' iMail addresses.