Showing posts with label publishers. Show all posts
Showing posts with label publishers. Show all posts
24 August 2015
The Pearson Widget and D2L
It is now possible to add a widget to connect your course offering in D2L with the MyLab product from Pearson.
01 May 2013
Quiz Converter without Respondus
Rich Path at the University of Wisconsin-Madison has created a tool to convert test banks that are in any word processing program (Word, iWork, etc.) into a Desire2Learn question import file. The file can be imported directly into a quiz or the question library. This basically does what Respondus does for free.
https://kb.wisc.edu/luwmad/page.php?id=41417
It is Windows and Macintosh compatible. Here is some sample syntax for four different question types (true/false, multiple choice, long answer, and ordering). Notice that the questions are numbered sequentially and there is a blank line between each question.
1. I am a college student.For a more detailed reference view the D2L Question Tool Documentation.
TRUE
2. What color is the sun?
A. Red
B. Blue
C. Green
*D. Yellow
3. Describe the process you used to select a college major.
order 4. From shortest to longest, order by length:
centimeter
inch
yard
meter
furlong
kilometer
mile
league
29 August 2012
Creating Random Question Section in a Quiz
Here are the steps to create a random block of questions on a quiz (Note: Questions must exist first in the Question Library - it will help if the questions are already sorted by chapter or topic into specific sections within the Question Library.):
- Go to a quiz and select the Layout/Questions tab. Then click on the Add/Edit Questions button.
- Select Random Section from the dropdown menu and press the Create New button.
- Type a name for the section (students will not see the name) and click the Save button - you will return to the list of sections and questions in your quiz
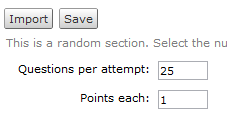
- Click on the section name to enter it and click the Import button - you must import the questions into the random section before you can select the number of questions and points per question.
- Choose a Source Section from the library (the page refreshes to show the questions in that section)
- Select the questions you want the random block to select from (i.e., if you want each student to get a random set of 25 questions out of a block of 50, select 50 questions) or select all questions and click the Save button
Those questions have now been copied into the random section in your quiz - Under the Questions per attempt enter the number of questions each student will see (i.e., if you want each student to get a random set of 25 questions out of a block of 50, select 25 questions) and points per question and click Save
- On the Layout/Questions tab for your quiz, the random section appears along with "Random Question" entries to match the number of questions you want each student to see. Use these same steps to give every student the same questions but in random order. The questions still need to exist first in the Question Library, but you can make the number of questions you select in step 5 above match the number of questions in the section.


08 December 2009
From EZ Test to Desire2Learn
If your publisher (McGraw-Hill) offers the EZ Test program to create tests for your class, you can use it to create files to import into Desire2Learn. The linked document has instructions on how to use this software to create a random block of questions in a Desire2Learn quiz:
From EZ Test to Desire2Learn
From EZ Test to Desire2Learn
14 November 2008
Preparing Quizzes
This posting describes the minimum steps to get a quiz ready for use. Some steps can be done in a development course offering before they are copied into a course offering that will have students in it:
Links to Quizzes in the Content area
For each quiz, there will be a broken quicklink in the Content area. Depending on how you set up your quizzes in Blackboard, you may have one module with all of these links or they may be distributed among the modules. You can which content topics are quicklinks by the icon ( ). You have two options for each of these quicklinks:
- Remove them (this will not remove the quiz) Students can see the Quizzes area so they can still take these quizzes.
- Click in the check box next to each of the quiz quicklinks you wish to remove
- Click the delete icon (
 ) to remove the selected quicklinks
 - Edit them so they point to the appropriate quiz Choose this option if you want to maintain the quiz links within the flow of your content design.
- For each quicklink, click the edit icon (
 ).
). - On the Properties tab, the URL field will be empty - click the quicklink icon ().
- Select Quizzes from the Category menu and then the appropriate quiz for this quicklink.
- Click the Insert button and then the Save button.
Connection to Grades
The connection between each quiz and the grades area is not maintained, so a grade item will need to be created for each quiz that you want to count toward the course's final grade:
- On the Quizzes page, click the name of a quiz to edit it.
- In the General section of the Properties tab, click the link to add grade item.
- In the New Grade Item window, type a name for the item and a point value and click the Save button. The point value does not have to be the same as the total points of the questions on the quiz; Desire2Learn will automatically adjust scores based on the ration between the value of the questions on the quiz and the value of the grade item.
- Turn on the options to allow automatic export to grades and attempt to be graded immediately upon completion if you want the grade data to appear in the grades area immediately (similar to Blackboard).
- Click the Save Quiz button.
Submission Views
The default view of the quiz when a student submits it is to see only the points earned and the total points possible for the quiz - not how each question was answered. You can change these settings by changing the default submission view for each quiz:
- On the Quizzes page, click the name of a quiz to edit it.
- Click the Submission Views tab.
- Click the Default View to edit it.
- Choose which options you want for this view and then click the Save View button.
Questions
To change or remove questions:
- On the Quizzes page, click the name of a quiz to edit it.
- Click the Layout/Questions tab.
- Click the Add/Edit Questions button.
- Select a question by clicking in its check box and then the delete icon () to remove it from the quiz.
As you confirm your deletions, the questions are removed and this action does not need to be saved in a separate step.
- Click on a question name to edit it (change question text, answers, etc.). As you click the Save button to confirm your edits to each question, the changes are made and this action does not need to be saved in a separate step.
Other tasks are best done in the course offering that will have students in it (do these after copying the course components from the development course offering):
Availability Dates
You may want to make each quiz available to students only during a certain period of time:
- On the Quizzes page, click the name of a quiz to edit it.
- Click the Restrictions tab.
- In the Availability section, choose to make the status of the quiz Active and a date range if you wish. Note that quizzes copied from Blackboard are active by default.
- Click the Save Quiz button.
11 July 2008
Import content from publisher
Desire2Learn does not yet work with the cartridge download keys that publishers provide for Blackboard, but you can get content from your publisher for use with Desire2Learn. Here are the steps:
- Tell the publisher you need a Blackboard or WebCT formatted course export file. Files can also be in SCORM format. The preferred format is Desire2Learn, of course, but not all publishers are yet able to provide that.
- Likely the publisher will give you a direct link to the file, or you might receive instructions to download the file from an FTP site. Download the file to your local computer. The file will have a ".zip" extension.
- In a Desire2Learn course offering, select the Edit Course option on the navbar and then Import/Export/Copy Course Components
- Choose the option to Import Components from a File and browse to the file you downloaded.

- The file will upload to D2L and you will get an opportunity to select the entire package or just certain sections, just like copying components from another course offering.

Subscribe to:
Posts (Atom)