Showing posts with label content. Show all posts

06 May 2014

Content Access Stats and Videos

There are three ways to post videos in the content area of Desire2Learn, and the method you choose affects whether the amount of time students spend on the video is recorded:
  1. External link - This is an easy way to link to videos online, especially those that are on servers that are not delivered securely. Whether a student clicks on the link is recorded, but the amount of time they spend is not recorded. It does not matter whether the external link is set to open in a new browser window.
  2. File with a quicklink - This allows the instructor to provide context for the video before the student clicks on it to watch. It also can be set to open in a new browser window, which saves students from having to deal with the security warning for videos that are not delivered securely. The amount of time that students spend watching the video (as long as they do not navigate away from the original content file) is recorded.
  3. Video embedded within a file - For videos delivered securely, this is a nice option. It allows the instructor to type instructional context around the video window and students can watch the video while still within the Desire2Learn course offering. The amount of time students spend watching the video is recorded.
The attached image shows the access stats for the same YouTube video shared with each of these views. 

09 January 2014

Upload Videos to Google Drive and Embed in Desire2Learn

This is cross-posted on Greg's Google Blog

Video files can be uploaded to an instructor's Los Rios Google Drive and then embedded within a course offering on Desire2Learn. This video shows how to do this and includes an option to prohibit downloading by viewers.


30 August 2013

User Progress

Desire2Learn automatically records a variety of data on activity associated with its various tools. In general, this data can be accessed from three areas:

  1. The tool itself (e.g., View Reports for the Content tool)
  2. Each student's View Progress link from the Classlist
  3. The View User Progress link on the Edit Course page

24 April 2013

Content

The content tool includes a feature called Course Overview, which instructors always see but students do not unless it is empty. Also instructors can drag and drop files directly into the browser window, and there is a file viewer so that students do not have to have a local desktop application to see certain files*. These features and more are demonstrated in the video for D2L content.


*: The following file types can be viewed with Desire2Learn's inline file viewer (all other types must be downloaded before they can be viewed):
  • Images:
    • Graphics Interchange Format (.gif)
    • Joint Photographic Experts Group (.jpg, .jpeg)
    • Portable Network Graphics (.png)
  • Text:
    • HyperText Markup Language (.htm, .html)
    • Microsoft Word (.doc, .docx)
    • Plain Text (.txt)
    • Portable Document Format (.pdf)
  • Presentations:
    • Microsoft PowerPoint (.ppt, .pptx)

06 September 2012

Who Can See a Particular Content Module or Topic?

If you use release conditions to plan an individualized learning path through your course content, you can see which topics a particular student can see by viewing that student's progress report:
  • On the Classlist, click on the Progress Report icon () for a student.
  • Click the Change button and choose the Content tool and click Apply.

  • The page shows a list of all content modules and topics - a closed eye next to a module/topic name indicates that particular student cannot see that particular module or topic

30 August 2012

Embedded Content and Google Chrome

The Google Chrome browser handles web pages with mixed secure and insecure content in a subtle way that might frustrate users who encounter it. For Desire2Learn, this occurs when insecure content is embedded. The linked video shows a couple of ways to handle this.


29 August 2012

Working with Multiple Files

It is possible to upload several files directly to the Manage Files area of a course offering to make it easier than uploading files one at a time.
  1. On your local computer, create an archive containing all the files you want to upload. This file will end in a .zip extension.
  2. In your course offering, go to the Manage Files area by selecting that choice on the Content page (or on the Edit Course page).
  3. Click the Upload link and select the archive file you created in step 1.
  4. Unzip the file by clicking Unzip from the dropdown menu. 

Now you can create content topics for these files in a couple of different ways.

Method 1 (Create content topics while on the Manage Files page):
  1. Click in the check box for each of the files you want to make a topic and then click the Add Content Topics icon.

  2. On the Add Multiple Topics page, you must select a Parent Module for all of these files then give them a title. Click Add when finished.

Method 2 (Create content topics while on the Manage Content page):
  1. Click the button to Add New Topic and select Course File.
  2. Select Parent Module and create a Title.
  3. Click the Browse button to find the file you uploaded and press the Select File button.

  4. Click Save.

Create New File vs. Upload New File

Students will have easier access to content topics if they are web pages instead of MS Word documents. For the latter, students must have the appropriate software installed on their computers and understand how their browsers handle links to files. Since formatted text can be copied and pasted into the Desire2Learn text box editor, it is easy to convert your Word documents into web pages:

  1. Open your file in MS Word
  2. In Desire2Learn, create a new content topic and select Create New File
  3. Select the relevant text in MS Word and copy it
  4. Paste that text into the text box in Desire2Learn
In the text box you can also insert a quicklink, so you can link from this page out to another web site or to a component inside your course (a discussion topic, quiz, or dropbox folder).

By making your documents web pages, your students get quick access and spend less time fiddling with downloading files or dealing with browser security settings. A benefit for you is you can edit the document online using Desire2Learn's built-in web page editor.

27 August 2012

Editing Files Uploaded as Topics

There are two file characteristics you can change once a file has been uploaded as a topic in the content area (i.e., if you chose the "Upload New File" option after clicking the button to add a new topic):
  1. The name of the link in the content area (what students click on to view the file from their perspective in the content area) To do this, click the edit icon for this item when you are on the Manage Content page.
  2. The name of the file in the Manage Files area (students do not see the name of the file until they download it) To do this, click the rename icon when you are on the Manage Files page.
Changing the content of a file can only be done on your local computer. If you do not have access to the original file (the one you uploaded when you created the topic), you can download the file from your course offering, edit it on your local computer, and then upload it to your Manage Files area. If you do not change the name of the file while editing on your local computer, you will be prompted to replace the file on the server when you upload it. To do this, click on the upload icon when you are on the Manage files page.

Students Printing PDFs

When a content topic is a PDF file and it is set to open in the same browser window, Desire2Learn's "Print this topic" button will not print the PDF file. Instead, students have to right-click on the PDF file itself and choose Print from the pop-up menu or (depending on browser and operating system) click the printer icon that appears when you mouse over the PDF file.

*This issue affects Internet Explorer and Safari and Students only. Instructors do have the ability to print while they are viewing the course content.

Content Quicklinks to YouTube

Content topics that are quicklinks to YouTube videos do not work properly if the link is set to open in the same browser window. So there are two ways to use YouTube videos as content in your course offering. First copy the URL for the page from YouTube. Then do one of the following:
  • Create a content topic (quicklink) and click in the box to open the link in a new window
  • Create a content topic (new file) and click on the Insert Stuff button to embed the video on the page
The Insert Stuff button can be used to embed the video with YouTube's embed code.

20 January 2012

Shared Google Docs and D2L and Internet Explorer

Adding the domains *.losrios.edu and https://docs.google.com to the trusted sites in Internet Explorer will ease the display of shared Google Docs within D2L. However, the shared Google Doc must be set up as a content topic (quicklink) to open in a new browser window. This should not affect when a Google Doc is embedded within a content topic (new file).

Thanks to Jena Bills for sharing her discovery.

05 October 2011

Who Has Visited a Content Topic?


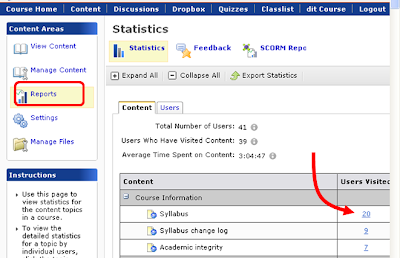
The Reports page in the Content area shows a table with how many students have accessed each content topic and you can click on the number to see who those students were.

02 September 2011

Character limit for various text fields

The various identifying fields inside Desire2Learn have limits on the number of characters (including spaces) allowed:

ToolItemFieldLimit
NewsItemHeadline400
ContentModule and TopicTitle150
DiscussionsForum and TopicTitle250
DiscussionsMessageSubject150
DropboxFolderName128
QuizzesQuiz
[Properties and Submission Views and Reports]
Name256
QuizzesQuiz
[Restrictions]
Password20
QuizzesQuestion Library 
[Sections and Random Sections]
Name256
QuizzesQuestion Library
[Questions and Information]
Title256
QuizzesQuestion Library
[Question Images]
Description1791
GradesGrade Item and CategoryName127
EmailCompose New MessageSubject256
AttendanceRegister and SessionName128
AttendanceSessionDescription128
CalendarEventTitle128
ChatChatTitle150
ChatChatMessage400
ChecklistChecklist and ItemName128
GroupsCategory and GroupName128
GroupsGroup Code50

24 August 2011

Export vs. Copy Content

One of the challenges in selectively copying content from one course offering to another is the requirement to choose the appropriate Course File in addition to the specific Content items in your copy. You may find it more efficient to export the content from your source course offering and then import the content into the destination course offering. It requires you do store the export file on your local computer and therefore does not take place entirely on the server (as the copy function does). However, the export tool can automatically include all related Course Files. Note that the Course Files copied are those that are content topics, so any files that are quicklinked within a content topic are not included. [VIDEO DEMO]

24 May 2011

Recycling course offerings

Desire2Learn does not have a recycle tool like Blackboard does, so if you are done with a development course offering and want to start over from scratch, you can clear out the material using each tool's delete function. Here are some things to keep in mind:
  • Not all course files may be deleted when you delete topics and modules on the Manage Content page, so check the Manage Files page to see if anything is there after you delete content topics and modules
  • Grade items cannot be deleted if they are associated, so clear the discussion, dropbox, and quizzes areas before you clear grades
  • Before you can remove discussion topics or forums, dropbox folders, or quizzes, click the Delete button on those pages first - you have to enable the ability to delete before deleting anything on those pages
  • To see the bulk delete option for news items, click on the Show All link at the bottom of the News widget first

22 February 2011

Parallel Organization in Manage Files and Manage Content

A good reason to give the files in the Manage Files area an organization parallel to what you have in the Manage Content area, where folders in Manage Files match the modules in Manage Content, is it makes selective copying of content and course files much easier. I found it effective to create the folders before creating any content topics. That way when I click the Choose Destination button on the New Topic page I will have a place to stick the new or uploaded file that matches the module structure already in place.

22 January 2011

Names for Content Topics

For the content in my online class, I typically have a module per week or lecture subject. The first content topic within that module is an overview of the subject, with a list of associated assignments and other resources I have available within that module. I like to give that topic the title "Overview," but this can cause a problem when I want to link to that topic from some other place or use it as part of a release condition. In a full-term class I might have a dozen or more topics named "Overview" and therefore might pick the wrong one. To help me with this I include the name of the module in the name of the overview content topic (e.g., "Reconstruction Overview"), but still call it "Overview" in the Short Title field.

21 January 2011

Simultaneously edit content items

On the Manage Content page, the multi-edit icon can be used to make changes to several topics and/or modules simultaneously. [VIDEO DEMO]

08 December 2008

Limit a Syllabus to Certain Students

Revised 11/2013

If you group students from multiple classes into the same course offering, you may want to show some content (like the syllabus) to students enrolled in a certain class. Use the release conditions to do this. Here are the steps:
  • When creating a new topic or editing an existing topic, click the Restrictions tab (this is the same tab that has the date restrictions)
  • In the Release Conditions section, click the button Create and Attach


  • Select Section Enrollment as the condition type in the pull-down menu that appears

  • In the Condition Details portion of the window, choose the section from the pull-down list - you will need to match the five-digit enrollment code that is part of the section name
  • Click Create and you will see your release condition at the bottom of this page.

  • Click Save and this content will only be visible to students who meet the criteria you selected.
After you create a release condition, it will be available for your use on any other item in your course offering. You can click the Attach Existing button to limit other content items, quizzes, dropbox folders, etc. You can copy release conditions from class to class, but this example will not work in any other class because the section code will differ.