29 September 2009

Quiz Statistics and Ungraded Attempts

The quizzes page shows the number of attempts and graded attempts for each quiz, separated by a slash. If the numbers are not equal (i.e., if there are one or more ungraded attempts) clicking on the statistics icon may show an error. You can mark a quiz attempt as graded by clicking on the grade icon for that quiz. Then click on any ungraded attempts to view them, click the Auto-Grade button, click the check box to indicate the quiz is Graded, and then click the Save button. The quiz statistics should be visible.

Even if the statistics icon returns an error, you can likely view the statistics for each question on the quiz and the overall statistics in the grade area (if the quiz is associated with a grade item).

Thanks to Eddie Fagin for asking the question that led to this answer.

28 September 2009

Pagers and Quizzes (In Progress)

If the quiz option is chosen to prevent use of the pager tool, that tool will be unavailable for students to use as long as that quiz attempt is in progress. This block perpetuates indefinitely, so it is possible for a student to be prevented from using the pager months after the semester ends in which the student did not complete the quiz attempt. When students in this situation try to use the pager, the system tells them the class that has the quiz attempt in progress. If the class was from a prior semester, it will require the instructor's help to remove the block.

Instructors can remove the block without making the entire class active by submitting the quiz on behalf of the student. This is explained in another blog entry.

Respondus LockDown Browser and the Macintosh

Apple's Snow Leopard operating system breaks the Respondus LockDown Browser in two ways:

  1. The keyboard shortcut for screen capture works while the browser is on (Apple/Command + Shift + 4)
  2. The screen-recording function built in to QuickTime X works while the browser on (it must be turned on before the browser is started)

This is for the Snow Leopard operating system only (not Leopard). I have reported this bug to Respondus and expect them to fix it soon.

24 September 2009

Saving Time with Release Conditions

If you reuse course components for a new semester, you may find it tedious to change the availability dates for the content modules, quizzes, dropbox folders, and discussion topics in the new course offering. One trick to save some time is to use release conditions to make certain items invisible until a student has taken some other action.

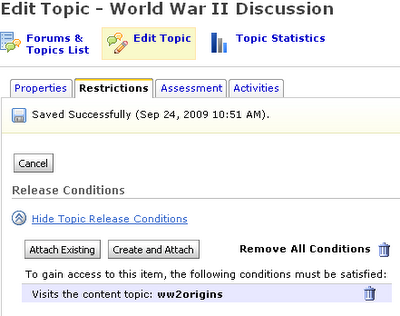
For example, you might not want them to post a comment in a discussion topic until they have visited the relevant content topic. If the discussion topic is conditionally released based on visiting that content topic, you can dispense with setting a date for that discussion topic to appear. Here are the steps for this example:
  • On the item to be conditionally released, click on the Restrictions tab and then click the button to Create and Attach in the Release Conditions section of this page.
  • Choose the type Content Topic visited and then choose the appropriate content topic
  • Click the Create button and your release condition will appear (don't forget to click Save)

This cannot be used to set the end date of an item, so you will still need to change the availability dates for things that have due dates.
Remove Course Offerings

The process for removing course offerings is the same regardless of its creation process:

  • Make the course inactive
    On the Edit Course page, select Course Offering Information, uncheck the box indicating the course is active, and click Save.
  • Change your role within the course to Student
    On the Classlist page, select your name, click the Change enrollment button, change your role to Student on the following page, and click Save.

23 September 2009

Filling in the Blanks on Answer Weights

For each answer in a fill-in-the-blank question, its weight is the percent of the question's point value the student earns for typing a correct answer. So if your question has four blanks and you want them to count equally toward the question's points, each should have a weight of 25.

17 September 2009

Respondus LockDown Browser and Mutiple Institutions

It is possible for a computer to be used the same term for online exams at different institutions outside of Los Rios. If those non-Los Rios institutions also use the Respondus LockDown Browser, the student will need to take some steps so they can use the browser with multiple institutions. These are from an email I received from Respondus:
If the student is running LockDown Browser for Windows, she can create a new LockDown Browser shortcut with your institution ID. 
Here's the steps for running LDB for two different institutions on a Windows system. First, I'll assume she has installed other institution's version of LDB.
  1. Copy the LDB shortcut on the desktop and paste the copy back onto the desktop.
  2. On the second copy, "right click" on the icon and select "Properties"
  3. Under the "General" tab, add "LosRios" to the end of the "LockDown Browser" title.
  4. Under the "Shortcut" tab, add " /ID=xxxxxxxxx" (without quotes), where "xxxxxxxxx" is the 9 digit institution ID for your LockDown Browser. You can see the ID at the end of the URL that you distribute to students.
  5. Save the shortcut.
  6. Double click on the new shortcut to start LockDown Browser and verify it is accessing your institution.
The student may also want to edit the properties of the LDB shortcut title for the original install so she doesn't confuse the two. 
If the student has a Macintosh, she will need to uninstall the other institution's copy of LDB and install your copy of LDB. But there is a little workaround if the student has Windows XP under Bootcamp (not a Windows VM like VMWare or Parallels) by installing and running the second LDB while in Windows under Bootcamp.

Weighted Grades and Item Points

If you use the weighted grade system, some students might be confused if they can see the points earned per item and the weighted grade per item. If an item has low points but a high weight and students did not score well on that item, they might wonder why their weighted percentage is lower than their percentage of points possible. You therefore might decide to show only the weighted grade for each item and not the points:
  • On the Grades page, select Grades Settings and then Org Unit Display Options
  • The Submission view options controls what your students see
  • Turn off the display of points and then click the Save button

10 September 2009

Change Question Points after Grading

If you change the point value of a question (or answer) after students have taken a quiz and been graded, there are some things you can do ex post facto to re-score those questions:
  1. On the Grade page for the quiz, click on the Questions tab.
  2. Click on the question that needs to be re-graded and then click the grade icon - this refreshes the page and gives you the opportunity to give all students who gave a particular answer a specific point value.
  3. Click the Save button and your score changes will be applied.

03 September 2009

Export/Archive Courses and Grades

Instructors can export courses from Desire2Learn for archive purposes:
  • From the Edit Course page, select Import/Export/Copy Components
  • Choose the Export Components option and click Next
  • Choose the components you want to export and click Next
  • Click Next to confirm, then Desire2Learn generates a .zip file for you to download. Click on the link to download your file.

This file can be imported into any Desire2Learn course offering, so this is one way you can share course components with other instructors. Course offerings remain on the server for three years, so they will be immediately accessible to you during that time.
No student data is included in an export, so this is a poor way to archive class grades. To do this, get to the User List page by clicking Enter Grades on the left side of the page. This page has a button to Export Grades. Click this, and on the following page choose options and click Export to CSV. This creates a file to download that provides the quickest access to grade information for this course offering.