The decision to receive notifications is the student's, and they can choose text messages and/or email. Safer options are either to change dates and/or content in the source course offering before copying stuff over or creating items manually.
Showing posts with label copy components. Show all posts
Showing posts with label copy components. Show all posts
12 December 2014
Copying course material and notifications
Be aware that when copying material into a course offering that is active, any users in that course offering who subscribe to notifications will receive notifications as appropriate for the new materials as soon as they appear. This can confuse students if you copy a News item, for example, that includes information about upcoming class events or due dates and you plan on editing those dates after you copy the News items over. (Users who sign up for News notifications receive an alert immediately when a News item is posted.) Similar situations will occur with Dropbox folders and Quizzes, which provide notifications two-days before end dates or due dates.
The decision to receive notifications is the student's, and they can choose text messages and/or email. Safer options are either to change dates and/or content in the source course offering before copying stuff over or creating items manually.
The decision to receive notifications is the student's, and they can choose text messages and/or email. Safer options are either to change dates and/or content in the source course offering before copying stuff over or creating items manually.


29 August 2012
Creating Random Question Section in a Quiz
Here are the steps to create a random block of questions on a quiz (Note: Questions must exist first in the Question Library - it will help if the questions are already sorted by chapter or topic into specific sections within the Question Library.):
- Go to a quiz and select the Layout/Questions tab. Then click on the Add/Edit Questions button.
- Select Random Section from the dropdown menu and press the Create New button.
- Type a name for the section (students will not see the name) and click the Save button - you will return to the list of sections and questions in your quiz
- Click on the section name to enter it and click the Import button - you must import the questions into the random section before you can select the number of questions and points per question.
- Choose a Source Section from the library (the page refreshes to show the questions in that section)
- Select the questions you want the random block to select from (i.e., if you want each student to get a random set of 25 questions out of a block of 50, select 50 questions) or select all questions and click the Save button
Those questions have now been copied into the random section in your quiz - Under the Questions per attempt enter the number of questions each student will see (i.e., if you want each student to get a random set of 25 questions out of a block of 50, select 25 questions) and points per question and click Save
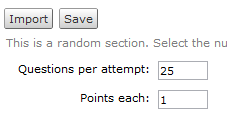
- On the Layout/Questions tab for your quiz, the random section appears along with "Random Question" entries to match the number of questions you want each student to see. Use these same steps to give every student the same questions but in random order. The questions still need to exist first in the Question Library, but you can make the number of questions you select in step 5 above match the number of questions in the section.


Images for Quizzes
There are two places to store images associated with quiz questions or sections. One is with the question or section itself. There is an option to add an image file and select one from your local computer. The second place to store images is in your course offering files. You can choose this source when you add an image to a question or section. In this second case, you would have had to upload the image files to your Manage Files page before you can add the image to a section or question in a quiz.
The advantage of using a course offering file as a question or section image is that the file is available for your use elsewhere in your course offering. For example, you might display the image in a content topic and then later ask students questions about that same image in a quiz. Note that quiz images stored in this way are not copied from one course offering to another when only quizzes are copied. The corresponding course files must also be copied.
The advantage of using a course offering file as a question or section image is that the file is available for your use elsewhere in your course offering. For example, you might display the image in a content topic and then later ask students questions about that same image in a quiz. Note that quiz images stored in this way are not copied from one course offering to another when only quizzes are copied. The corresponding course files must also be copied.
To add images to a quiz question from a local computer follow the steps below:
- Edit the quiz you want to add images to.
- Under the Layout/Questions tab click the Add/Edit Questions button.
- Click on the question to want to edit.
- On the Image section click the Add a File button.

- Press the Choose File button to browse for the image you want to add, once you have chosen your file click the Open button then click the Upload button to upload the image to the question.

- Your image should now appear on the image section. Once you are done you can Preview the question or just Save.


To add images to a quiz question from your Manage Files follow the steps below:
- Under Manage Files from the Edit Course menu click the Upload icon.
- Select the Choose File button to browse for the image then click Open. *You can upload all your images at once by clicking the Add Another File button.
- Once you have finished choosing your images click the Upload button.
- Then go to the quiz you want to edit.
- Under the Layout/Questions tab click the Add/Edit Questions button.
- Click on the question to want to edit.
- On the Image section click the Add a File button.
- Choose the link Course Offering Files, it will list all of the files from the course. Select the radio button of the image you want then click the Select File button.

- Your image will now appear on the Image section. Preview your image and click Save to finish.

27 August 2012
Copy Components from Course to Course
You can copy course components among any course offering in which you are the instructor. This is a step you will need to do for each course offering, as the process that creates "official" course offerings (the ones with students) only creates empty shells.
The steps are easy. It's like going on vacation and deciding what to pack after you arrive. The process differs whether you want to copy an entire course offering or select certain items. Note that the first two steps are the same in both processes.
The steps are easy. It's like going on vacation and deciding what to pack after you arrive. The process differs whether you want to copy an entire course offering or select certain items. Note that the first two steps are the same in both processes.
Sharing Custom Widgets Among Courses
Perhaps you created a custom Twitter widget or a banner widget that you want to share with your other courses.
- Click on the course you want to add the custom widget.
- Click on Edit Course and chose Import/Export/Copy Components.
- Make sure Copy Components is selected and press Next.
- On Existing Offering scroll down and select the course you want to import from and press Next.
- Select Widgets from the list. Choose Individual Items to Copy to select only the custom widget you want. Press Next.
- Select the widget you want to copy over and press Next.
- On the Confirm Components to Copy box review and press Next to accept.
- Once the widget is completed it will show a green checkbox. Press Done to finish. You can then go to the Homepages, Content/Layout and add your custom widget.
11 May 2012
Sharing Course Materials with Other Instructors
An easy way for a couple of instructors to share resources via D2L is through a development course offering, which one instructor would create and then enroll the other as an instructor in the same course offering. (Development course offerings have no automatic enrollment except for the instructor who requested them.)
To do this, on the Employee Self-Service page there is a link to “D2L Development Course Requests.” That page has help with thestep-by-step instructions, which are basically the same as requesting an official course offering.
The course offering will be created the following morning (like official course offerings), and then the instructor who made the request can manually enroll anyone in via the classlist.
Once course materials have been uploaded and/or created inside the development course offering, any of the enrolled instructors can copy the material over from the development course offering to an official course offering.
To do this, on the Employee Self-Service page there is a link to “D2L Development Course Requests.” That page has help with thestep-by-step instructions, which are basically the same as requesting an official course offering.
The course offering will be created the following morning (like official course offerings), and then the instructor who made the request can manually enroll anyone in via the classlist.
Once course materials have been uploaded and/or created inside the development course offering, any of the enrolled instructors can copy the material over from the development course offering to an official course offering.
24 August 2011
Export vs. Copy Content
One of the challenges in selectively copying content from one course offering to another is the requirement to choose the appropriate Course File in addition to the specific Content items in your copy. You may find it more efficient to export the content from your source course offering and then import the content into the destination course offering. It requires you do store the export file on your local computer and therefore does not take place entirely on the server (as the copy function does). However, the export tool can automatically include all related Course Files. Note that the Course Files copied are those that are content topics, so any files that are quicklinked within a content topic are not included. [VIDEO DEMO]
03 September 2009
Export/Archive Courses and Grades
Instructors can export courses from Desire2Learn for archive purposes:

- From the Edit Course page, select Import/Export/Copy Components
- Choose the Export Components option and click Next
- Choose the components you want to export and click Next
- Click Next to confirm, then Desire2Learn generates a .zip file for you to download. Click on the link to download your file.


This file can be imported into any Desire2Learn course offering, so this is one way you can share course components with other instructors. Course offerings remain on the server for three years, so they will be immediately accessible to you during that time.

No student data is included in an export, so this is a poor way to archive class grades. To do this, get to the User List page by clicking Enter Grades on the left side of the page. This page has a button to Export Grades. Click this, and on the following page choose options and click Export to CSV. This creates a file to download that provides the quickest access to grade information for this course offering.


22 August 2009
Copying Grade Schemes
You can copy grade schemes among course offerings within the Schemes section of the Grades tool. On the Grades page, select the Grades Schemes option and click the Copy button on the Schemes List page. You will see a list of all the grades schemes you created in all of your course offerings (including the current one). Select the scheme you want to copy, type a name for your new scheme, and click the Copy button.
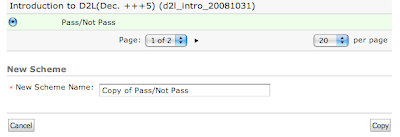
The following page is the edit page for the scheme you just copied.
11 July 2008
Import content from publisher
Desire2Learn does not yet work with the cartridge download keys that publishers provide for Blackboard, but you can get content from your publisher for use with Desire2Learn. Here are the steps:
- Tell the publisher you need a Blackboard or WebCT formatted course export file. Files can also be in SCORM format. The preferred format is Desire2Learn, of course, but not all publishers are yet able to provide that.
- Likely the publisher will give you a direct link to the file, or you might receive instructions to download the file from an FTP site. Download the file to your local computer. The file will have a ".zip" extension.
- In a Desire2Learn course offering, select the Edit Course option on the navbar and then Import/Export/Copy Course Components
- Choose the option to Import Components from a File and browse to the file you downloaded.

- The file will upload to D2L and you will get an opportunity to select the entire package or just certain sections, just like copying components from another course offering.

10 July 2008
Course Creation and Enrollment
You will request a new course offering for each class for each semester that you want to use D2L. That means that no students will be linked to your current course offerings. When the request process is ready (about two months before the term begins), you will be able to request course offerings for your classes. Those will be created overnight, and then you can copy the components over.
The request process takes place via the Employee Self-Service web page. Online help is available on that page: http://www.losrios.edu/ess [VIDEO DEMO]
The copy process is very easy. Select the Edit Course link on the navbar and then Import/Export/Copy Components. Stick with the default option (Copy Components from another Org Unit) and then click the Next button. You can choose any other course offering you are teaching from the "Existing Offering" pull-down menu. The page will refresh, showing you how many items are associated with each component. There is a check box to "Select All Components" and a Next button. (You can copy only certain components if you wish.)
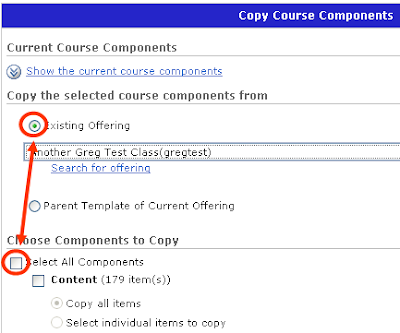
The copy process takes a short amount of time (a few seconds to a minute or two). Once finished, you can edit the components in the new course offering. Any changes you make in the new course offering will not affect the components in the old (source) course offering.
By default, all new course offerings are not active, which means student users cannot see it. On your My Home page, any inactive courses are indicated by italic text (Inactive). To change a course offering's active status, choose the Edit Course link on the navbar for that course and then Course Offering Information. On that page is a check box to change the course offering's active status. [VIDEO DEMO]
Enrollment happens automatically, beginning seven days before the start date for that class. Students who add your class will appear on your classlist the day following their official enrollment in your class. Student users will also be dropped the day following their official removal from the class. Grade information for dropped students is not removed and will reappear if they are added again to the classlist.
The request process takes place via the Employee Self-Service web page. Online help is available on that page: http://www.losrios.edu/ess [VIDEO DEMO]
The copy process is very easy. Select the Edit Course link on the navbar and then Import/Export/Copy Components. Stick with the default option (Copy Components from another Org Unit) and then click the Next button. You can choose any other course offering you are teaching from the "Existing Offering" pull-down menu. The page will refresh, showing you how many items are associated with each component. There is a check box to "Select All Components" and a Next button. (You can copy only certain components if you wish.)

The copy process takes a short amount of time (a few seconds to a minute or two). Once finished, you can edit the components in the new course offering. Any changes you make in the new course offering will not affect the components in the old (source) course offering.
By default, all new course offerings are not active, which means student users cannot see it. On your My Home page, any inactive courses are indicated by italic text (Inactive). To change a course offering's active status, choose the Edit Course link on the navbar for that course and then Course Offering Information. On that page is a check box to change the course offering's active status. [VIDEO DEMO]
Enrollment happens automatically, beginning seven days before the start date for that class. Students who add your class will appear on your classlist the day following their official enrollment in your class. Student users will also be dropped the day following their official removal from the class. Grade information for dropped students is not removed and will reappear if they are added again to the classlist.
Subscribe to:
Posts (Atom)