Showing posts with label manage files. Show all posts

29 August 2012

Working with Multiple Files

It is possible to upload several files directly to the Manage Files area of a course offering to make it easier than uploading files one at a time.
  1. On your local computer, create an archive containing all the files you want to upload. This file will end in a .zip extension.
  2. In your course offering, go to the Manage Files area by selecting that choice on the Content page (or on the Edit Course page).
  3. Click the Upload link and select the archive file you created in step 1.
  4. Unzip the file by clicking Unzip from the dropdown menu. 

Now you can create content topics for these files in a couple of different ways.

Method 1 (Create content topics while on the Manage Files page):
  1. Click in the check box for each of the files you want to make a topic and then click the Add Content Topics icon.

  2. On the Add Multiple Topics page, you must select a Parent Module for all of these files then give them a title. Click Add when finished.

Method 2 (Create content topics while on the Manage Content page):
  1. Click the button to Add New Topic and select Course File.
  2. Select Parent Module and create a Title.
  3. Click the Browse button to find the file you uploaded and press the Select File button.

  4. Click Save.

27 August 2012

Editing Files Uploaded as Topics

There are two file characteristics you can change once a file has been uploaded as a topic in the content area (i.e., if you chose the "Upload New File" option after clicking the button to add a new topic):
  1. The name of the link in the content area (what students click on to view the file from their perspective in the content area) To do this, click the edit icon for this item when you are on the Manage Content page.
  2. The name of the file in the Manage Files area (students do not see the name of the file until they download it) To do this, click the rename icon when you are on the Manage Files page.
Changing the content of a file can only be done on your local computer. If you do not have access to the original file (the one you uploaded when you created the topic), you can download the file from your course offering, edit it on your local computer, and then upload it to your Manage Files area. If you do not change the name of the file while editing on your local computer, you will be prompted to replace the file on the server when you upload it. To do this, click on the upload icon when you are on the Manage files page.

24 August 2012

Link to a Course File from the Navbar

You can link to a course file directly from the navbar. This is a useful way to make an important file to students always available, no matter where they are inside your course offering.
The file must first be in your Manage Files area. If you uploaded it as a content topic, it is already there. If not, here are the steps:
  1. Go to Edit Course and then the Manage Files page.
  2. Click the upload button to select a file from your local computer to add to this page.
Once a file is in your Manage Files area, you can add a link to it on the navbar:
  1. Go to Edit Course and then the Navigation page.
  2. Click the name of the currently active navbar for your course. Note: The default active navbar for CRC courses is called "CRC_brand_NavShell (Go Hawks!)."
  3. Click on the Links tab.
  4. Click the Actions button of the navbar (Bottom Left, etc.) where you want to add the file link.
  5. Click on Add New Custom Link.
  6. Type in the Name you want the navbar to display (this is what students will click on to activate the link).
  7. Click on the Insert Quicklink icon.
  8. Choose the Category of where the particular file is located, then under Content select file and click the Insert button.
  9. Select if you want the link to appear in the Same Window with Navbar, Entire Window or New Window then click the Save and Close button.
  10. Refresh your page and the new link should appear in the navbar.

22 February 2011

Parallel Organization in Manage Files and Manage Content

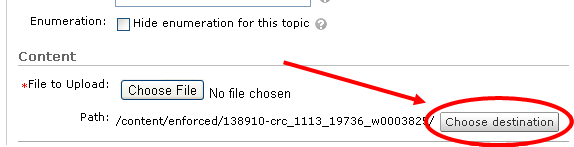
A good reason to give the files in the Manage Files area an organization parallel to what you have in the Manage Content area, where folders in Manage Files match the modules in Manage Content, is it makes selective copying of content and course files much easier. I found it effective to create the folders before creating any content topics. That way when I click the Choose Destination button on the New Topic page I will have a place to stick the new or uploaded file that matches the module structure already in place.

04 August 2008

Organizing Content (Modules and Folders)

Each time you create a Topic in your Content area, that item exists simultaneously in two areas:
  1. The Content area, where you control student access to the material
  2. The Manage Files area, where you can upload files directly from your local computer
The organizational structure for each of these areas is distinct. In the Content area, "Modules" are used to control the flow of information as it is presented to students. In the Manage Files area, you can use "Folders" to make the list of files easier to view. There is no automatic relationship between Modules and Folders, so a Folder will not be created for each Module. When you remove a Topic or Module from the Content area, you are asked whether you want to remove the corresponding files from the Manage Files area at the same time: If you choose the default (top) option, the files will remain in your Manage Files area but will no longer appear in the Content area. You can make them reappear by selecting the Course File option when you create a new Topic (anything in your Manage Files area is a Course File eligible for selection). The Manage Files area is a convenient place to upload files from your local computer, like PowerPoint presentations and Word documents. Those files are then available to be linked as Course Files, either as a Topic or as a QuickLink within a New File Topic.